I undertook a complete renovation of my
Grampian 26. I had to paint the deck since the gelcoat was too far gone and
I wanted to repair all the hairline cracks and other cracks and dents.
I used Interlux paints, 2 coats of 2 part
epoxy primer and 2 coats of 2 part polyurethane. I was quite satisfied with
the results. The paints were applied basically with a thin nap roller and
the results were good. It takes a bit of practice to get the paint thinning
right. A lot of care must go into the preparation:
- cleaning
- dewaxing with a
solvent wash
- sanding
everything with 80 grit
- repairing the
cracks:
- small hairlines: opening them with a Dremel tool and filling
- bigger cracks: repairing with fiberglass tape
I tried as much as
possible to identify the source of the cracks such as no backing plates
under stanchion bases and correct this. I had cracks between the cabin walls
and the deck. I opened those and covered
with a thickened
epoxy mixture ( ideally with fibers) topped with a sandable epoxy mixture
smoothed with a spoon to create a cove.
I also had to
identify the delaminations and repair them either by opening up and removing
the bad balsa and replacing with epoxy or by injecting epoxy if the wood was
dry. This is the worst part of the job and if you skip on this cracks will
reemerge.
Also I removed all
fixtures
Painting over the
antiskid can lead to slippery antiskid if it is already worn. Several
solutions are possible but in my case, I sanded it down and covered with
antiskid pads . This is expensive but gives a very good result both
esthetically and from a security standpoint.
The job I did, which
was as complete as could be, ( removing all hardware and repairing all
cracks) took me more than 250 hours, but the paint job itself was relatively
quick, about 25-30 hours.( 2 coats 2 parts epoxy primer and 2 coats 2 part
polyurethane)
The results with a roller and some foam
brushes, while not a 'mirror finish' and more like 'orange peel' is quite
good and professional looking if you take care to catch the paint runners
with the foam brush. But I would definitely say that 2 part epoxy is a pain
in the neck and requires care in terms of the correct thinning. You have to
practice to get the feel. Also you have to proceed quickly and not go over
and over the same area. It is not easy and it is a messy job.
The results after 2 years are still as new.
The 2 part paint is very resistant and I have read that it could last 10
years especially in our latitudes. I certainly hope so.
As for the spider cracks covered with the epoxy primer they have so far not
reappeared
(Thanks to Eric Maille
for this) (Back)
I painted the hull and deck of my G26
a couple of years ago. Did a very thorough job on the hull, less thorough on
the deck as we were running out of time.
On the hull (flag blue) we sanded
three times starting with 80 grit and ending with 250 grit. We patched all
the nicks and bumps with Bondo which is actually an automotive market
product but which worked really well. We did not have any blisters on the
hull or I would probably have used something more specifically marine.
We then used two coats of Interlux's 2
part epoxy and three coats of their 2 part finish. Sanded between each coat
starting with 250 grit and ending with 800 grit. Applied the paint with a 6"
foam roller and tipped it with a brush dipped in the reducer. I was pretty
pleased with the results although I think one more coat would have given the
perfectly glossy and deep finish of spraying. This method left no orange
peel. Part of the trick is to thin the paint much more than you would
think-- the thinner the coat the better, less build = less orange peel.
On the deck we filled all holes with
Bondo and painted with the one-part urethane finish in a tan color. On the
non-skid we used flat finish on the smooth parts we used high gloss.
I also re-glazed the cabin windows at
the same time and while I had the aluminium trim pieces out we spray painted
them with a high gloss white enamel.
I was pretty pleased with the effect
over all. When I pulled into the slip for the first time after the paint job
the neighbor shouted out, "now there's an old girl who's looking good."
Guess that was good enough.
(Thanks to M. Reynolds for this)
(Back)
- I did it about 7 years ago, and
used Imrrom by Dupont, this is polyurethane paint, is used also in
aircraft painting.
-
I
f
you subscribe to "Practical Sailor" their Feb. 15, 2003 issue rates
topside paints. Their quote re "One -Part Wonders" is as follows:
"One-Part wonders
Interlux Toplac and Epifanes Mono-Urethane give two-part brews a run for
their money--a short way into a long event".
As stated earlier, I used Toplac
(white) three years ago and with good preparation (as Interlux recommends)
and application with a 3" foam roller, it took a weekend. My deck hardware
was removed for rebedding, so I'm sure that contributed to the short time
to do the job. It still has that "new waxed" shine three years later.
- I don't have much experience on
this subject. However, I did use Interlux one part on the cockpit which
included some of the nonskid surface. The thing I did correctly was to
thin the paint and roll it on with a very short nap roller. This prevented
clogging up the nonskid pattern and destroying its usefulness.
(Back)
Another annual task is painting the
bottom of the boat to reduce marine growth on it. Here are the views of a
few owners on this task on what to do and what to use. After learning the
hard way my recommendation if you are using an ablative paint is to use less
rather than more. Thinning the paint reduces build up and is cheaper.
The harder the bottom paint, the harder
it is to remove, regardless of how you do it. I am currently doing three,
One is a 1997 Mac 26', I power washed it when I pulled it at 1850psi, wet
sanded in about two hours and is prepped and ready. It had Petit
Hydroseal on it a water based bottom paint. It also had been in the water
for the last five years and had a huge growth of danzella on it, hit it
with the power washer and stink, man it would stink.
The second boat was a 2002 Catalina
25', again with Petit Hydroseal on it. Dealers like the Hyroseal due to
it being a water base and cheap. Anyway, again a power wash at 1850 and a
couple of hours wet sanding and it's ready, in fact it's finished, about
10 hours start to finish. The Mac is not painted yet as it is a swing
keel and that takes longer anyway with all the back crawling.
The third is a real basxxrd! It is a
93 Hunter 27', it has been painted several times, had never been sealed.
I pulled it, power washed it and low and behold, blisters, blisters and
more blisters. The first bottom was done by the dealer, the remaining
jobs done by a local "professional shop", it was sprayed, not rolled,
never barrier coated. You can see the different layers as you sand. Now
with this one I have been fighting weather a little, the first two. One I
prepped in the fall and have the keel off for other problems, the second I
did about 10 days ago and weather was grand, the final one I have had bad
weather days to do it. In fact Sat we had winds 40 with gusts over 45,
air temps in the low 60's. Not good weather for wet sanding and stripping
three coats off. So yes I had to use the old method, the DeWalt DA, SMURF
time. It took two hours to strip the keel, will keep you posted on the
progress. The first layer came off pretty easily, the remaining two not
so fast, still working on them, wishing for a warmer day. This boat ended
up with over 450 blisters, three layers of bottom paint and will be just
plain more time intensive.
Last fall I stripped an epoxy job, due
to the colder weather did the DeWalt thing, it took about 60 hours and
about a hundred bucks in discs, strippers wouldn't touch it.
Also the paper and grit are important.
It seems that all the cans say, sand with 80Gt in preperation for paint.
Well most of the wet sanding I use is
with 100 grt wet or dry, the dark gray stuff, it is better paper than open
coat and lasts longer. Two of the above boats I used less than half of an
8.5X11 sheet of paper. For the epoxy stirp job it took probably 100
discs. If I have a really hard one, I will move to 80 grt wet or dry,
have never had to go coaser.
For dry sanding, I use a tyvex suit,
positive pressure resperator if I can, a two stage if I can't, and a
DeWalt 6" DA(dual action) sander. The grits I use for this range from 120
to 40, yes 40. If I have to use 40 like on epoxy I hit it fast and keep
moving, then move to 80 for a final sand, I use 120 on the leading and
trailing edges. This is an area that cuts really fast. You will develop
a touch and each boat is a little unique due to age, number of coats, type
of paint etc. and you will do the little things a little different,
Bottom line, your method has to match
the bottom and the weather.
Wet sanding advantages, cuts fast, no
dust to breath, gives you great pecs and arms. But you need a little warm
weather here, in a short sailing season this may be hard to get. It also
is pretty forgiving unlike dry you can cut the gel coat pretty fast if you
get the DA cocked. I prefer it when I have the weather as I have
experienced some of the problems associated with it, got blue sinus, even
got my liver out of whack once, respritory stress etc.
Chemical stripping can be done on the
gooey ones like VC Tar, the paper just loads too fast to get anything
done. Fumes can be toxic and have long term negative effects.
Blasting also works for the VC Tar, is
quick, easy but can be expensive, I would NOT do sand, would only do soda
blasting but personally would only do it on Tar, never a paint. Dealers
like it because it's fast.
What ever method you use, think your
health first.
I do every bottom like it was my
bottom. I used to work on this old guys little fishing boat, he's dead
now, but he loved that boat. He never made a great deal of money and that
little 16' fishing boat was his yacht, it was spick and span always. One
of my guys got a little sloppy with it and spilled some anti-freeze on it,
it really pee'd me off. He said, "well it's just an old fishing boat", I
said yeah but it is his yacht, it's all he can afford, he takes impecable
care of it, he's 80 years old and that is to last the rest of his life and
you will respect it and him or you ain't working for me, on second thought
your fired. One' mans ghetto may be another mans mansion, we got to
respect one another.
Well, anyway, no one tool or method
works for every situation, try what you know but don't be afraid of making
a little change. The one boat I was using 60 grt, was going slow, went to
40 and bang things got twice as fast. Have seen it go the other way, go
to a lesser grit and iproved speed.
It just takes time, let the paper do
the work and as was in the movie Karate Kid, wax a on, wax a off, wax a
on, wax a off, build those pec's and arms, take up a new hobbie, like arm
wrestling. (Ken Cox, O'Day)
Ok, a couple of things you may
initially disagree with, but while I was at Strictly Sail in Chicago I
went pretty much head to head with some factory guys and have changed my
opinions on a few things and believe me I don't change what has worked
for a long time for me easily.
Here are some thoughts. First, VC-17
is an excellent paint, second I will never use it again!
Reason being I can get as good of a
bottom with the two upper end Interlux products, one is for salt water
and one is for fresh. You can get as smooth of a bottom, it will last
multiple years and will burnish as smooth or smoother. You can touch up
easier, do a larger build up for less cost, don't need to do every year,
indicator layers and more. The difference in VC-17 and the top end
products could not I bet be measured in performance on the race course,
you can make more time up by saving tons of hours doing bottom paint and
having more time for rig maint. and time to practice and reduce errors
on the course. You would lose more time in a blown tack than the
difference you have with VC-17. My race boat is not kept in the water
but inside and covered, it is performance waxed before every race by my
crew.
Third I wlll never use the 2000
series epoxy product of Interlux(I did three last year), I like this
stuff and have used it for years and will never use it again. Here is
why, it refers to micro plates. I don't have a catalogue or can in
front of me so a little memory work here. That chemical is the vein
dust out of granite that is used to ABSORB and channel the water out of
the stone. It will also fracture and fail and still give the
possibility of a local blister, but does reduce the possibility of large
scale multiple blisters.
The Interlux bottom paint doesn't
HAVE to be sprayed but it could be. I think you get better build up by
rolling and then you can burnish it better. I think if you spray it you
get a cheaper thinner job. I used to have a competitor that sprayed
bottom paint, he did a lot of jobs fast and cheap but had to do them
more often. I would almost guarantee you that if you spray it you waste
a major portion that never makes it onto the boat and is paid for and
lost, now with it thinner if you burnish there is less to burnish and
you will re-coat sooner.
Now for what I think is the final
items, blisters and barrier coat. I will take them one at a time.
Blisters, three options, take the one you like they are all epoxy.
Marine Tex, two part Epoxy, sands easily, easy to work with. Interlux,
I think the part number is like 402 & 403, it has recently been
reformulated, not as good as the old product, thinner, sags more in a 24
hour time frame, harder to sand, can cross contaminate, must be
purchased in larger quanity and most of the time requires two layers,
that shoots a week end all to hell. Final choice, West or MAS Epoxy,
tricker to mix with fillers, be careful to get the right filler, glass
fibers can cause major lung problems, hardest of them all to sand and
fair.
Barrier coat. This is the one that
will make you think but think it through before you disagree, because I
argued to great length here at the boat show. I no longer use Interlux
2000 series because there is a better product, West Systems or MAS. I
prefer MAS, the reason being, less thermal build/distortion and no amine
blush. I have used West for years for many things but not barrier
coat, late last year had to use MAS to finish a repair job as I couldn't
get West in time to complete on time. I used the MAS and it is more
user friendly, 2-1 is easier to use in small quantity's than 3-1, as
least for me. Don't have to have the pumps that fail waste product
etc. I also no longer use Acetone to clean fiberglass. This also leave
a residue that has to be cleaned and now I use thinner. I no longer
will use Imron paint either. My lungs say thank you. Pigment can be
added to MAS for color. The MAS can be sprayed but I wouldn't, it will
require two people, one to roll and one to tip, would get in area's not
wanted, overspary etc.. You must also not get in joints like the rudder
to hull. You must also remove the tape faster so as not to get it
hardened in. I also think the product cost for a MAS barrier coat will
be cheaper than the Interlux but haven't put a pencil to it. I could
give more reasons but this should cover it.
Your local Boaters World has the MAS,
in fact they have discontinued the West line. (Ken Cox, O'Day)
In the past I have used a grinder
on the keel to remove rust. This last year I had a fellow come and
sandblast the bottom as well as the keel. In my opinion, the only way to
go. It took about 30 minutes for all the old paint to be removed from
the bottom of my 26 footer. I went to the Interlux web site and decided
on using Primicon for the base coat and Micron for the finish. October
the boat will be hauled for the winter and if the paint is still
attached to the bottom, I will be a very happy Grampian owner. Fairing
the bottom and keel did take some time. The keel isn't symmetrical
because when it is poured the one side of the keel doesn't match the
other side. I use 3M Premium Filler for this job. Where the keel meets
the hull, I use Sikaflex. you might want to ask Jan Mundy at DIY
Magazine, about having the bottom peeled. It sounded interesting but I
decided to follow a more traditional route.
I did run into one problem at launch time in the spring. I thought the
bottom paint had dried and therefore allowed the hull to sit on the
support pads of the cradle. When the crane lifted my boat to put it in
the water, one of the pads was stuck to the hull. It took a lot of
effort for the pad to be removed. I would be interested if any one has a
solution for this problem. It sure makes you gulp when you see the
fiberglass bulge when the pad is removed, I was surprised I didn't end
up with a portion of the bottom torn off the hull. (Seventstoo -
Delphi) (Back)
__________________________________
On Haefen, a G28, one of
the previous owners took parts from small bar fridge and installed them in
the icebox. The compressor is in the lazarette along with the heat exchanger
and then the pipes are put through a small hole into the ice box
and connected to the cold plate (the ice box on a G28 has access from the
galley and from inside the lazarette). The whole thing is plugged into the
shore electrical - so when I am in the harbour I get ice against the cold
plate and refrigerator temp on the far side - whole thing keeps good and
cold for a day of sailing when off power, and way cheaper than a "marine"
unit if you know how to solder up the pipes and refill the refrigerant....(Liam
Donworth)
________________________________
I installed refrigeration in the
ice box itself. The ice box on the G30 could be
used for another state room. I divided it off with a vent hole
to pass cold air from the freezer section to the
forward fridge compartment. We went on a three week trip and
it worked pretty good.
Don't think I have any pictures of the install but it
was just two plates you put inside the ice box then
the compressor I installed on a shelf in the
starboard storage area, which is also huge. (Bob
& Sherry Whittall)
__________________________________
-
Hull Cleaning
There has been
discussion on the Yahoo Discussion Group as to how to best clean your hull
and what is the best product to use. Here are some of the suggestions. (The
Grampian Owners Marina Website does not endorse any specific product.)
I use a product called Aqua Buff
2000. it will clean up the original gel to new, Its easy to use and
works great with an orbital buffer at slow speeds, then give it a good
coat of wax and it looks like new gel;
I use Collinite hull cleaner No
920 (apply with a damp cloth) and follow up with Collinite wax No 845.
Labor intensive but well worth the outcome. Our yacht club members
thought we had purchased a new boat.
You might want to consider Poly
Glow, it is applied easily and does not require buffing. Check it out
at
http://www.poliglow-int.com.
We've used it for years and are very happy with it
__________________________________
-
Cooking on Board
Another discussion on
the Yahoo Discussion Group has been on how and what to cook on board
with limited space and resources. Again, here are some of the
suggestions made:
Arrange running water at the
sink & use the bottom of the conk stove lid (formica on my boat) as
additional counter space by setting it on the quarter berth.
Don't know what you're talking about. The galley in my GC31 has more
counter space than the galley kitchen in my post WWII kit home in
suburban Maryland.
I have to agree, the galley on our
2-34 had more counter space than our first apartment! Add in the
propane 2 buner stove with oven and we had no problem cooking
anything we wanted. For a while we were cooking out of the
weightwatchers cookbook as (oddly enough) we found that a lot of
dishes in there didn’t need refrigerated ingredients!!
Since we only have a propane stove on our G30, my
wife and I like "The
Two Burner Gourmet: The Cookbook for Cooking Far
from Home" by Terry Searfoss. As the title
suggests, it has recipes for boating, camping, etc.
See
http://www.amazon.com/Two-Burner-Gourmet-Cookbook-Cooking/dp/0964373300.
We ran across this some years ago at a boat show
where the author was demonstrating (and promoting
his book).
Another book
to look at is One Pot Wonders by
James Beard
We have a
simple 2 burner unpressurised
alcohol stove which is less hot than
propane or diesel/kerosene, but
works fine and is totally safe. On
our G26 the cook/mealprep space is
increased by an extension from the
built in galley to a shelf extending
aft from sink about 2 ft towards the
so-called 'pilot berth'. Use
folding shelf supports to hold it
up, and stow stuff underneath.
Don't use the berth as a berth, but
for stowage - in our case a
top-loading,
slide-out fridge-freezer
.
Check out a cook book called,
the Two Burner Gourmet - The Cookbook for Cooking Far from Home..
Written by a deceased friend, and Great Lakes Sailor, Terry "Foss"
Searfoss.
-
Mast Tuning
The mast just
sits in that big aluminum channel between the
bolts. It's a little surprising at first but she
will sit there happily for many miles if the rig
is tuned well. And tuning the rig is the
question I think most people have because just
stepping the mast is pretty straight forward. I
do remember being fairly apprehensive before
stepping my mast for the first time but I
needn't have been because the marina guys had
done it a hundred times and helped me out quite
a bit. It all goes from a loose, floppy mess to
a steady, standing mast pretty quickly and
you'll notice your mood will do the same.
Of course
you will have done all the prep work:
- make sure all the lights are
working
-
set all your sail and flag
halyards
-
radio antenna in place,
Windex set and tightened
-
wires labeled so you can
connect them quickly
-
special coin ready to place
under the mast
I
always loosen the turnbuckles to the
point of just about falling off so
that when connected and tightened
the studs pull into the body evenly
from both sides. This probably has
more to do with aesthetics than
functionality but it just looks
right. Lube the turnbuckles so
everything turns easily. Once things
are firmly hand tight or better, the
mast isn't going anywhere and you
can move the boat away from the
crane if need be. If they let you
stay and tighten everything up right
there, so much the better.
As for tuning the rig, a lot has
been written on this. I pasted one
write-up I found online below. If
you like being precise and exacting,
you will want to buy or borrow a
tension rig gauge though it can be
done without one. Having a second
person on the opposite side of the
boat matching you turn for turn is a
big help. The write-up below wasn't
written for Grampians per se so
there are a few bits that don't
apply:
A Mast Tuning
Guide - The Light Version
Mast tuning is simple if you
remember a couple of basic
principles. If you understand these
principles, you can tune just about
any mast.
The first principle, and probably
the most important, concerns tuning
the mast athwart ships. The diagonal
shrouds, lowers and intermediates,
always pull the mast to weather at
the spreader where they terminate.
The spreaders, on the other hand,
due to the compression from the
wires going over their tips, push
the mast to leeward. In order to
tune a mast, you need to establish a
dynamic balance between "pull" of
the diagonal and the "push" of the
spreader.
The second principle is that the
length of the headstay controls the
rake of the mast, i.e., the amount
that the mast is aft of plumb in the
boat. Masts, in general, should
always have at least a small amount
of rake, they are usually designed
for one to two degrees of rake. The
feel of the helm is the ultimate
test of the rake. Making a mast more
vertical will help weather helm and
more rake will help to correct lee
helm. This is a bit of a
simplification, but after all this
is the "light" version of mast
tuning.
The third principle is that most
masts should have a slight "prebend"
over their length with the headstay
firm from a minimum of backstay
load. Prebend can be visualized best
by stretching the main halyard down
the aft face of the mast. The
maximum distance that the back of
the mast is in front of the halyard
is the prebend (you should take into
account any offset that the position
of the main halyard sheave causes).
Prebend can be attained by
tightening forward lowers, chocking
the mast forward in the collar at
the deck, moving the mast step aft
(on a keel stepped mast), or
lengthening the headstay. The amount
of prebend varies from about 1" for
a single spreader deck stepped mast
to 6" for larger keel stepped spars.
The last principle concerns the
amount of tension in the rigging. As
a general rule, when the rig is
fully loaded up (top end of the #1),
the leeward shrouds should be
beginning to appear to slacken. They
can be deflected by hand, but not
swinging loose. This will approach
optimum general rig tension for most
normal boats. Individually the wire
tensions should be higher in the
lowers and uppers than in any of the
intermediates.
The tuning sequence that has
worked the best for us is to start
by centering the spar in the boat
athwartships with the uppers. We
tighten the uppers slightly. Next
the lowers are adjusted so that the
mast at the lower spreader is
centered on the masthead. Sighting
up the sail track is the best way to
determine this. If the mast has
multiple sets of spreaders, then the
intermediates are adjusted next
starting at the upper spreader. When
the mast looks to be in column from
the deck to the tip, then rig
tension can be applied (chock the
mast sideways and fore and aft now
if it is a keel stepped mast- make
sure the step position is correct
for the required prebend). We add
additional tension by adding equal
numbers of turns to each side of the
turnbuckles in the same sequence
that we first used. Make sure that
the turnbuckles are lubricated with
heavy lubricant to prevent galling
and damage to the threads. Check to
see if additional adjusting of the
shrouds is necessary as you add
tension to the rig. Check the
headstay to see if the rake of the
mast is correct. Check the prebend.
Tension the backstay and see if the
mast remains straight under load.
That should conclude the dock tune
portion of the setup.
A Few Hints
1. If the tip of your mast seems
to fall off, and your uppers are
fairly tight, try loosening the
intermediates.
2. Check the rake of a mast by
tying a heavy object to the main
halyard and measuring the offset
from the back of the mast. Subtract
any sheave offset present.
3. Make sure to do the final
tuning of the mast when sailing.
Make sure that the mast remains
straight athwart ships. Check that
the mast bends forward in the center
(the reason for prebend).
4. Check to make sure that the
bottom of the mast is square athwart
ships, and for a keel stepped mast
that the mast is straight through
the deck. If it is not, the mast
will be forced into an S bend that
is impossible to tune out. We
usually tune a keel stepped mast
with the deck chocks out and shim
the mast sideways after the mast is
straight athwart ships. Mast steps
and mast collars are rarely exactly
on the centerline of the boat.
5. Use a steel tape run up the
pole lift or main halyard to get the
mast vertical in the boat.
6. Always pin and tape
turnbuckles and cotter pins after
tuning. Be sure the cotter pins are
taped so that the sharp ends are
covered to protect people and sails.
Well, there it is, twenty-five
years of experience condensed into
one and one-half pages. Now you
should be ready to tackle tuning any
mast. In fact, I hear there are some
openings for riggers for the next
America’s Cup.
Buzz Ballenger, Pres.
Ballenger Spar Systems, Inc .
|
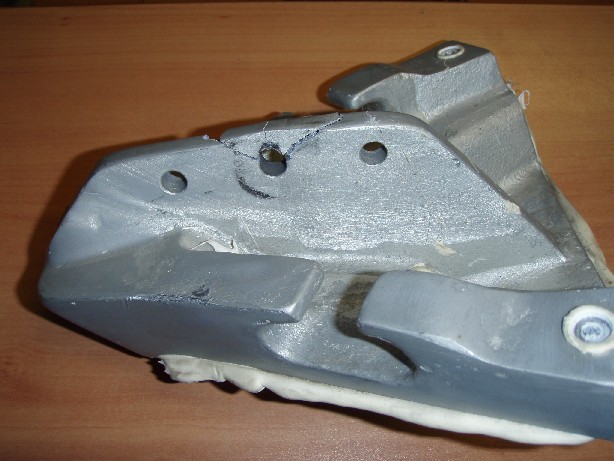
16. Forestay Fitting
Failure
Another
Forestay Fitting Failure: One of my customers brought this
casting in last week. This is a replacement for the original casting
and it lasted a mere 2 weeks.
As you can see, not only did the chainplate portion fail but the
casting also chipped where the front leg of the bow rail is
inserted. I think there is only one conclusion to be reached,
someone has gone into the business of re casting these stem heads
and is using the wrong alloy. During the days when Grampian was
building boats ,they used a foundry down on Front St in Toronto. The
alloy they were using was Almag 35 which was used specifically for
it's strength. My guess is that someone is using a utility grade
aluminum and are not aware of the dangerous situation they are
creating. (Stainless Outfitters)


 Click on thumbprint for larger image
You can find
more information concerning Forestay Fitting Failure on the G26 and
G30 FAQ pages.
17. Soft Deck Repair
Fall is the perfect time of year if
your boat is covered to expose any wet areas and let them dry during the
winter months. On the days its -2 and up on sunny days the temp. under
the tarp is a lot warmer and will help with evaporation.
How big is the area to be fixed? On my G28 I fixed an
area approx about one square foot around the mast step where the
previous owner just drilled holes for the VHF and mast wires and sealed
them with I hate to say, silicone. Needless to say this led to my
project. This was part of my full deck restoration and subsequent awl
grip paint job.
You need to take out as much of the saturated core as you can. Plywood
will hold it's integrity to some degree however the more saturated it is
the more compromised it becomes. Mine was 100% saturated and still firm
(I could actually squeeze water out.)
How I fixed it:
Read step 9 first.
1) drill a series of 1/2 inch holes (you can go smaller if you can
remove the core but the larger holes make it easier to remove the core)
as close together as possible 1/4-1/2 inch apart (using a spade bit in
reverse until you are through the glass and into the wood this prevents
the gelcoat from chipping) and only piercing the top layer of gelcoat/fiberglass
and the core. Leave the bottom layer of glass so go slow. while probing
the core as I went with a dentist pick. Remove as much wet core as
possible. Generally the water will come in through anywhere the deck has
been penetrated and not properly sealed and will over time spread mostly
through gravity but some will wick in all directions.
2) use an Allen key or sharpened nail bent 90 degrees in a drill to
remove as much of the wet core from the area and around each hole (not
as easy with plywood as apposed to balsa). Try and remove as much core
under the top layer of glass around each hole.
3) bevel the edge of each hole with a dremel tool. I did approx
30degrees
4) place a halogen work lamp directed at the wet area not too close if
you are leaving it unattended it shouldn't get hot to touch but warm
(make sure your insurance is up to date haha). Halogen works best but be
careful. Leave this as long as you can if the boat is covered until you
must seal it up. I'm in Ontario Canada so mine was drying for half the
year haha. The longer the better.
5) cover up anywhere you went through the bottom layer of glass from
inside with tape. A good strong tape is heat shrink tape and epoxy
doesn't bond to it.
6) pour just enough resin (no hardener) into the holes to coat the
remaining core. Work it into all the voids with your gloved finger. Let
it sit for awhile. An hour or more (maybe not necessary?) but you want
it to soak into the remaining core.
7) mix up enough epoxy with hardener to fill your area. Mix in cabosil
and cotton (you can get this at most marine stores that sell epoxy.
Noahs in Toronto area) so that it is thickened to a light paste. Work in
the epoxy until it comes out the adjacent holes. Make sure to work it
into all voids and work out any bubbles. you can use a large bore
syringe to squeeze it in. It's important to fill the entire area with no
voids. It's ok if the epoxy is coming above the holes since it will
shrink a little as it cures and you can always sand it down after. I
used a wooden stir stick courtesy of Starbucks to work it into the
holes.
8) once the epoxy has cured you can sand the epoxy flush to the deck.
9) I was lucky since I was painting my decks afterwards so that as long
as the deck was faired out smooth I was ok. You'll have to decide how to
cover these repairs be it paint or attempt gel coat. Or you can leave
them since I hear girls dig scars? At least at this point it is dry and
structurally sound.
Note: it is possible to do this from the inside and not piercing the top
layer however it is difficult to work with the epoxy upside down and
also the location inside. This will be less noticeable if you are
worried about the covering and paint.
This may seem extensive but there really isn't a quick and easy way to
repair this. It took me approx a total of 5 hours combined to do this so
not that bad. I hope this was clear enough and didn't confuse you. (ANTEUP
II Mike Ante)
_________________________________
Might I suggest anyone who
is looking at doing this kind of work invest in a copy of
Don Casey’s book “This Old Boat” I bought a copy and it’s
full of good methods for just this type of repair. It looks
as though a second edition has come out since I purchased it
so I may go and buy a second one myself. (Steve Hunter)
____________________________
Just posted a soft deck repair
video on Youtube:
www.youtube.com/user/captnpauley (Paul
Esterle)
____________________________
18. Contact Cement
Removal
Does anyone have any suggestions on how to remove contact
Cement from fiberglass? I'm trying to get ready to
re-tab/tab some shelves and bulkheads to the hull and I have
removed the carpet and it seems as if grinding doesn't do
much other than clog up grinding disc and sand paper. (Briggs
Monteith)
I've
heard there is a 5200 remover available. Maybe that would
work on your contact cement removal (Tom Roberts).
We've had success with
adhesive removers like "Goo Gone" and "Goof Off". I found
them in the paint department at Home Depot. One was water
based and the other solvent based. Some old sticky gunk came
off with one, other gunk with the other. (Tim Nye)
(Back)
19. Washer/Rudder
Assembly
I have
a Grampian 30. I noticed the other day (after the
nor'easter blew through NC) that a brass washer has split
and broken away from my rudder assembly.
It goes
on the floor of the cockpit (horizontally) where the rudder
shaft comes through the boat. It seems to be a washer (1/4
inch thick) between the shaft and tiller connection.
The washer is split in two pieces.
How important is this piece? Where can I get another (what
is it called so I know what to ask for?)? And how to
reinstall it without removing the rudder shaft? (Timothy
Hickman)
___________________
If I
recall correctly, there should be a pin through the rudder
post that sits on this flat washer. I think this is the
main device that holds the rudder onto the boat! check out
http://www.grampianowners.com/G30/faq%20G30.html (Dan
Sundy)
____________________
The only washer for the
rudder on my G30 is steel, goes on the rudder post and,
above that, a pin goes thru the post to secure the rudder
when the tiller is removed. Without the washer, the pin
would ride on the cockpit floor (which of course is not
sturdy enough without the washer to protect it). From
memory, both the pin and washer are about 3/16 to 1/4
thick/diameter. Is this the washer you are referring to?
If so, you probably have to get a machine shop to fab one. (Bob
Weiber)
___________________
We have a G26 and
it sounds like the arrangement on your G30 is the same.
As Dan said,
there is a cross pin through the rudder shaft that rests on
this washer and bears the weight of the rudder. Without it,
the tiller head casting is all that holds the rudder on the
boat.
As a temporary
fix, I'd go to a welder and see if this washer can be brazed
back together. If so, orient the repaired washer so the
break line runs fore-aft on the boat centerline. This will
keep the cross pin at 90 degrees from the break line to
insure the cross pin will rest virgin material and not the
repair.
I've tied a line
to the bottom of the rudder and up to an aft cleat in order
to support the rudder's weight while I took off the tiller
head casting and cross pin. Of course, I've done this on
the hard while you'll have to get wet, but I'm sure the
water's warm where you are.
;-) I wouldn't
try this in deep water, just in case.
Measure the
washer while it's off, then try industrial bolt and nut
places (check the yellow pages for "Bolts" or "Fasteners").
Try sailing hardware suppliers, too. They might be able to
source something off the shelf. If you can only get
something close, then take it to a machine shop for a quick
job, or if you can't get anything like this, a machine shop
can make a complete new one.
One warning
though -- there are bronze bearings that might be available
in this size, but some of these are made from metal powder
that has been compacted and sintered (baked) together. This
is great for a bearing since the porosity allows oil to move
through the bearing, but these are weak and crumbly under
heavy loads.
On our G26 the
cross pin had cut through the washer and cut into the top of
the rudder tube in the cockpit sole. As a fix I got a 6"
square of 1/8" stainless steel sheet, drilled a hole in the
center for the rudder shaft and countersunk holes at the
corners for flat head machine screws, then bedded this plate
onto the cockpit sole. I filed flats on one side of the
ends of the cross pin and put the flats down to rest on top
of this plate. This fix replaces the brass washer
completely.
(This repair method wasn't my idea by
the way -- I found it on someone's webpage which I can't
find now.)
(Tim Nye)
_____________________
I
replaced the washers on my G30 last season. There should be
2 washers. One made of a white nylon plastic and the other
made from stainless steel. Take the broken pieces to a
marine machine shop and have them make you new ones.
Alternatively you can measure the diameter of the rudder
shaft for dimensions. The pin is what is holding the rudder
on the boat. To remove this pin without taking the boat out
of the water, tie a rope to one of the stern cleats, use a
docking pole to place the rope under the rudder, then pull
the rope tight and tie the other end to the other stern
cleat. You should be able to lift the rudder's weight up
off the pin by doing this allowing you to remove the pin.
You may need to use a winch on each end of the rope as the
rudder is quite heavy. The nylon washer should go on first
with the stainless washer on top of it, then the pin. Use
some water proof grease on the washers when you put them on.
If
you don't have a shop locally, call Barry Schnur at White
Water Marine in Port Huron, MI 810-987-4837. He made both
washers for me. (Jeremy Thompson)
_______________________
Re
rudder - washer for G 30 and perhaps others. I had a bad
system until a mashinist pal got a washer made of
something called Tessa 4970, I think it is a sticky tape
that he glued under a .015 ss washer which I stuck onto the
cleaned deck, waterproof grease a .10 thick ss washer with
ss welds acting as troughs for the pin and a shiny new ss
pin to hold up the rudder. It is a smoothe turn and dose not
rub against the gelcoat. (Hans Nita)
___________________________
20. Tuning Your Rigging
How do I tension the rigging on my boat?
The first couple
of years I had "Patience" I marked the turnbuckles when the
mast came down so I knew roughly what tension to put on the
next year. I have got a little bolder in recent years. What
I do is tension all around hand tight and then equally
tighten the upper stays. Next I check to see the mast is
straight using plumb line and eye. If Ok I start tightening
the bottom stays equally checking the mast that it does not
develop a bend. How tight? That is the question. All I can
say is that mine are tight and have no movement. I have read
that when sailing the off wind stays should not be flopping
around and should retain their shape. Mine are a little
slack but I still feel the rig is tight enough. The one I am
not sure about is the front stay. I just tighten that till
it feels good!! (Ken Corbett)
_________________
Since putting out
the feeler for tension info I had to get on with the job.
Fortunately there are some pretty good guys in our club, one
of whom had a tension setting tool. The literature along
with the tool gave tension in lbs for the wire diameter and
recommendations for the stays, though nothing on the
shrouds. I set the front and aft stays at about 750 lbs,
cringing as I cranked on the tension; the outers I set at
around 500 lbs. The shrouds a little less. The literature
mentioned that generally most people apply too little
tension, being afraid of driving the mast through the deck
or tearing out the chain plates. Nothing untoward has
happened, the boat sails well and I have not had to make any
adjustments so I guess the tensometer info was o.k. Under a
heavy load, heeling over to the rail the outer stay remained
taught while the shrouds had a little slack; the pro's said
that was quite o.k., even perfect.
I too did what
Ken mentioned, making note of the number of turns removed
etc when taking off the mast last fall but folks around here
said it doesn't work out because the structure of the boat
changes just that weeny bit due to winter weather, and last
years settings are not necessarily right to kick of in the
spring. Makes sense. With the tool it's a breeze, the cheap
variety costs around $70, and the one I was loaned, really
excellent, is around $120. I highly recommend the tool if
you can beg, borrow or steal one. (Ken Davies)
_____________
21.
Tips on Deck and Cockpit Repair/Replacement
Here are some tips from owners on having to repair the deck
or cockpit on a Grampian.
There are
those who have re-cored their cockpit/sole, decks, and more. Sometimes it's
fixed by drying and injecting epoxy into the old core. Sometimes it's a full
removal of the old cockpit sole, and using supports, creating a new inner
skin, adding a new core, then glassing the new core over, with the usual
grinding and layering of new glass, etc.
_____
I
owned 1973 G-26 #583 for many years. The cockpit sole was fibreglass over
3/4" marine ply covered with a layer of epoxy at the very bottom.
I had some softness issues at the start, but after sealing up and redoing
the rudder bearings etc. I was able to seal off the entire cockpit sole.
Owned the boat from 2001 to 2014 and never had another soft cockpit sole.
Once it dried itself out after the sealing, it was perfectly rigid again
_____
I would drill a few holes
half way through the cockpit floor from the inside. Be careful not to go all
the way through. I would cut out a piece of plywood to act a a cockpit
liner. Seal around the tiller and scuppers. Sail the boat for the rest of
the summer. Then tackle the floor over the winter. By then the water should
have squished out the holes. Personally since the cockpit is a small area I
would not go with epoxy injection but some one who has experience would be
better able to comment. I would save my repair time for rebedding the
pulpit, the grab rails and mast foot so that further damage would not
happen.
_____
Is the entire deck of the Grampian 26 made with
plywood core instead of balsa core?
Yes - only marine ply
and some hardwood pieces as backing for fasteners etc. No balsa on a G-26.
_____
I
recently removed all the balsa core from my cockpit floor and also the step
leading into the companion way.
It was all soaked to the bone.
The replacement is half inch plywood and reglassed. It's a job, but with the
right tools, ventilation, and good working gloves, it is well worth the
effort. Closed cell high density foam would be ideal to use as the core, but
it is expensive.
Plywood works well, just make sure you seal it well.
______
What if I use treated plywood for the core? I check on
west system epoxy and they claim that the bond is as good as standard
plywood.
I used pressure
treated and regular polyester on a power boat. Be sure to buy it from home
depot or similar where the plywood has been sitting in doors and is well
dried out. Its also the moisture content that makes it less sticky. In the
floor setting its not going to need a lot of adhesion anyway as force of t
you standing on it is not a lateral force ripping it off. Did you drill a
test hole from the inside?
_____
I became the proud owner of a G28
late last season. I have since had to repair or replace every system on the
boat. In the course of this work and the work on my 3 previous boats I can
tell you with absolute assurance that you really want to do it right the
first time!
I have had to do core repairs in the
side decks and cabin top due to shoddy construction and misguided owner
repairs. My side decks (coamings) were cored with standard plywood. They
were completely rotten from end to end. The reason that marine ply is best
for this work is that is is made up of woods that are very slow to absorb
water and are naturally resistant to rot and the glues used are waterproof.
Standard plywood will soak up moisture like a sponge and the glues are NOT
waterproof. The result is delamination and core rot returning.
Who wants to do this cap twice? It's
easy to say you'll do better that original but all you'd do is the same
thing they did really.
The cost of a sheet of marine ply is
not cheap, but it's not out of reach either. To do the entire cockpit would
only require one sheet, would leave you with leftovers for other projects
and would mean you did it right. If you love your boat, do it the right way.
Avoid the redneck repairs whenever possible, you'll get more enjoyment out
of the process and the results.
_____
While I tend to agree the jury is still out on whether
pressure treated is better than marine in some applications. For sure
regular plywood is no good. I bought a boat and the guy showed me the
invoice for a floor repair from redneck marine and tractor parts. It looked
great. But I didn't care as I was going to strip the boat. After I stripped
the boat I gave away the hull. I folded back the carpet to show the guy the
new floor. It was totally delaminated and rotting after only 2 years since
the invoice date. In my other application after 8 years I think pressure
treated was the way to go. If I wanted to replace core I would consider
divinylcell foam also as if marine ply were perfect we would be talking
about something else :-)
_____
I agree, foam is the best.
however, if you do use plywood, marine grade or regular BC sanded. Here's
how you can prevent delamination.
After you cut your wood to the
shape and size you need, take an 8" sander with some 60 grit just to lightly
take the mill off. then coat both sides with resin. I usually kick it off
pretty hot so I don't have to wait too long for it to set up. this will seal
your wood to prevent moisture getting in, or resin to seep down into the
wood when you lay up your glass. (If your wood is not sealed, then when you
lay up your glass some of the resin will seep into the wood while it is
setting up thus allowing dry spots in the lamination, and in turn,
delamination.)
Another thing, about using
pressure treated wood. When I started building boats and working in boat
yards doing fiberglass repairs more than 20 years ago, I was told by all the
old timers to never lay up fiberglass to pressure treated wood. They told me
it will delaminate. so, since I was learning a new trade by the best in the
business, I have never tried to use PT wood in any of my fiberglass
projects, or on any customers boats. Since I never used it, I will not
dispute someone else's experience that they may post on here. I'm only
sharing what I know. again, using the method I described in the beginning
about sealing your plywood works very well. I have never to this day had a
customer come back to me with any of my work delaminated.
_____________________


 Click on thumbnails